network monitoring software WhatsUpGold

June 26, 2009
network monitoring software/
WhatsUp Gold - Network Monitoring Utility

WhatsUp Gold network management software monitors over 100,000 networks worldwide. At Ipswitch we’ve been dedicated to IT managers for over 15 years and listen to our customer’s network needs.

We strive to simplify your complex networks with easy to understand network management products coupled with excellent support from our own network engineers.

Description
===========
WhatsUp Gold monitors vital network elements and system
services and generates an alarm when there is a problem.
It also facilitates remote support and diagnosis by
providing beeper, pager, e-mail, and voice notifications
and allowing users to view the status of a network map
from a Web browser.

Designed for PCs operating with Windows NT 4.0 or later,
Windows 2000, 98, 95, Me, WhatsUp Gold can be installed
wherever needed and does not require expensive,
dedicated hardware. It will run in the background on your
PC. WhatsUp Gold will work with any 32-bit TCP/IP stack,
such as those bundled with Windows NT and Windows. You
can configure WhatsUp Gold and start monitoring your
network without any special training.


New Features (WhatsUp Gold 6.0x)
===============================
- Web Interface now allows web security per map.
- Updated User Interface - toolbars, icons and dialogs made
more user friendly and intuitive.
- Modified menu layout and context menus.
- Map Improvements: Maps are now vector-based graphics that allow
snap-to-grids, zoom in and out, and the ability to resize maps
independently. Map properties now have unlimited color choices.
- Log Improvements: Improved the log file display to allow
filtering, printing, saving and copying. Also improved the
management of the log file size.
- Customizable notification plug-in system
- Added an SNMP Viewer tool that lets you quickly view the status
of interfaces on an SNMP device.
- Performance Reports now allow on-demand reporting, and the ability
to generate an hourly performance report.
- Added a tool to receive syslog messages.

Installation
============
NOTE: To view performance graphs with WhatsUp Gold, you must
have the ODBC32.dll installed. (If you have Office 97/98/00
or Windows 2000 it is already installed.)

To install or upgrade WhatsUp Gold:
- If you purchased a WhatsUp Gold CD-ROM, insert the CD-ROM.
If it does not run automatically, click Start, select Run,
and then enter the CD path followed by Autorun.exe.
For example, d:Autorun.exe
- If you downloaded WhatsUp Gold from our web site, run the
downloaded application, wugoldec.exe.


Upgrading
=========
If you are upgrading from a previous version of WhatsUp
Gold or WhatsUp, you should note the following:
-- Back up any network maps (.db for WhatsUp and .wup for
WhatsUp Gold). (When you open a .db file in WhatsUp Gold,
the file is automatically converted to the .wup format
and saved with a .wup extension.)
-- Back up your SERVICES.INI and HOSTTYPES.INI files.
During installation, WhatsUp Gold will ask if you want
to overwrite your old SERVICES.INI and HOSTTYPES.INI
files; answer No.
-- Be sure that WhatsUp Gold has completely shut down
before doing an upgrade installation. If you exit
WhatsUp Gold during a poll, it may take up to 30 seconds
for WhatsUp Gold to remove itself from memory. If you
press Ctrl+Alt+Del, WhatsUp Gold will remain in the Windows
task list until it is removed from memory.
-- Defined notifications are stored in a file named
IPNOTIFY.INI in your Windows or NT directory.
This file is shared by other Ipswitch products and is
therefore not deleted or replaced when you upgrade.


Download here

Official Ways to Disable or Manually Uninstall the Microsoft Windows Genuine Advantage Notifications from Microsoft

Official Ways to Disable or Manually Uninstall the Microsoft Windows Genuine Advantage Notifications from Microsoft

June 22, 2009

has released step-by-step removal instructions to disable or manually uninstall pilot or pre-release version of Microsoft Windows Genuine Advantage (WGA) Notifications (KB905474) which is versions that range from 1.5.0527.0 to 1.5.0532.2, although the instructions can also be used to uninstall the updated release and general release of the anti-piracy tool, but it will not be supported. Instead, Microsoft recommends to install general release of WGA Notifications (1.5.0540.0) to replace and uninstall the pre-release version during the pilot program.


If you uninstall or WGA Notifications component in your Windows computer which is part of the Windows Genuine Advantage program, Microsoft will offer the general release version of WGA Notifications at a later date (actually is immediately if you check for updates via Windows Update) through the Microsoft Automatic Update service or Windows / Microsoft Update service. So you must unselect the updates or reject the EULA when asked to install again. Microsoft instructions can be found here, or listed below.

Disable WGA Notifications

  1. Log on to the computer by using an account that has administrative permissions.
  2. Make sure that the WGA Notifications version that exists on the computer is a pilot version listed above. The version format for the pilot version is 1.5.0532.x. In this case, you can uninstall versions 527-532 only (Note: the steps should disable other version of WGA Notifications too). To find the WGA Notifications version, follow these steps:
    1. Click Start, and then click Control Panel.
    2. Double-click Add or uninstall Programs, locate and then click Windows Genuine Advantage Notifications, and then click Click here for support information.
    3. In the Support Info dialog box, verify the version number, and then click Close.
  3. Rename the following files by changing the extension to .old:

Rename %Windir%\system32\WgaLogon.dll to %Windir%\system32\WgaLogon.old

Rename %Windir%\system32\WgaTray.exe to %Windir%\system32\WgaTray.old

  1. Restart the computer.

Uninstall WGA Notifications Manually

  1. Log on to the computer by using an account that has administrative permissions.
  2. Make sure that the WGA Notifications version that exists on the computer is a pilot version that range from 1.5.0527.0 to 1.5.0532.2 (Note: other versions should works too). To find the WGA Notifications version, follow these steps:
    1. Click Start, and then click Control Panel.
    2. Double-click Add or uninstall Programs, locate and then click Windows Genuine Advantage Notifications, and then click Click here for support information.
    3. In the Support Info dialog box, verify the version number, and then click Close.
  3. Rename the following files by changing the extension to .old:

Rename %Windir%\system32\WgaLogon.dll to %Windir%\system32\WgaLogon.old

Rename %Windir%\system32\WgaTray.exe to %Windir%\system32\WgaTray.old

  1. Restart the computer.
  2. Unregister LegitCheckControl.dll by using Regsvr32 with these steps:
    1. Click Start, click Run, type cmd, and then click OK.
    2. At the command prompt, type the following, and then press ENTER:

Regsvr32 %Windir%\system32\LegitCheckControl.dll /u

  1. Restart the computer.
  2. Click Start, click Run, type cmd, and then click OK.
  3. At the command prompt, delete the following files by typing the Del command and follow by pressing ENTER after you type each command.

Del %Windir%\system32\wgalogon.dll

Del %Windir%\system32\WgaTray.exe

Del %Windir%\system32\LegitCheckControl.dll

  1. At the command prompt, type regedit.
  2. Locate and then right-click the following registry subkeys. Click Delete after you locate each subkey.
    • HKEY_LOCAL_MACHINE\SOFTWARE\Microsoft\WindowsNT\ CurrentVersion\Winlogon\Notify\WgaLogon
    • HKEY_LOCAL_MACHINE\SOFTWARE\Microsoft\WindowsNT\ CurrentVersion\Winlogon\Notify\WgaLogon
    • HKEY_LOCAL_MACHINE\SOFTWARE\Microsoft\Windows \CurrentVersion\removeremove\WgaNotify
Restart the computer
Disable and Remove Windows Genuine Advantage Notifications Nag Screen

Disable and Remove Windows Genuine Advantage Notifications Nag Screen

June 22, 2009

This page has been updated, visit the new article on how to bypass and disable the WGA or way to make your Windows genuine permanently.

Microsoft has released WGA Notifications application which effectively turned Microsoft Windows operating system into a ‘nagware’, with a “This copy of Windows is not genuine” warning. What the Windows Genuine Advantage Notifications application does what it will check your Microsoft Windows XP validity. If it found that the copy of Windows XP is not validated, not genuine, counterfeit, unlicensed, pirated, illegal, unauthorised or simply failed the Windows Genuine Advantage validation process, then the notification messages will appear at various places and time.

Disclaimer: This article is for informational and educational purpose only, as most information is found on various part of Internet. Readers should contacts Microsoft if their licensed or OEM software cannot be validated or purchase genuine software.

When you log on to a non-genuine copy of Windows XP, the following notification error message “This copy of Windows is not genuine” will pop-up on the logon process:


And the nicely said “You may be a victim of software counterfeiting” message on the bottom right corner of log-in screen:


Microsoft allows Windows faithfuls to have 2 options: Get Genuine or Resolve Later. Click on Resolve Later will temporarily bypass the notification and let you login into and use Windows nagged with notification icon and messages, which will randomly appear as balloon notification message with an icon in the notification area (system tray).


Clicking on the balloon notification or the notification area icon will lead you to the Windows Genuine Advantage Validation Failure Web page that contains the specifics of the validation failure and the steps that you can take to make the operating system genuine.

To get rid of the WGA notifications that intends to remind you that your Windows is not validated, you can buy a validly licensed copy of genuine Microsoft Windows.

Update: Bypass WGA Validation with Crack or Hack and Disable WGA Notifications Warning Message Workarounds

Latest Version: 1.5.554.0 on October 2006 (distribute to some computers with no known roll-out pattern), 1.5.708.0 on September 2006 (distribute to whoever wants to download from Microsoft Download Center), 1.5.540.0 on 28th June 2006, 1.5.532.2 on 6th June 2006, 1.5.532.0 on 30th May 2006, 1.5.530.0 on 23rd May 2006, 1.5.526.0 on 26th April 2006.

More information on WGA Validation Tool (KB892130) and WGA Notifications (KB905474) which install LegitCheckControl.dll, WgaLogon.dll and WgaTray.exe.

With new release of WGA, some methods no longer works, and some has been updated. Several methods that has certain success on certain people, you may try until you success.


First Method

  1. Lauch Windows Task Manager.
  2. End wgatray.exe process in Task Manager.
  3. Restart Windows XP in Safe Mode.
  4. Delete WgaTray.exe from c:\Windows\System32.
  5. Delete WgaTray.exe from c:\Windows\System32\dllcache.
  6. Lauch RegEdit.
  7. Browse to the following location:
    HKEY_LOCAL_MACHINE\SOFTWARE\Microsoft\
    Windows NT\CurrentVersion\Winlogon\Notify
  8. Delete the folder ‘WgaLogon’ and all its contents
  9. Reboot Windows XP.

Note: With this method, you may be prompted to install WGA Notifications again which can still be unselected.

Second Method

Another alternative suggested by dman is by using System Restore to restore the PC to a previous restore point that WGA Notifications hasn’t kicked in, and then carefully stop KB905474 from been applied to the system. To use System Restore, go to Start -> All Programs -> Accessories -> System Tools -> System Restore.

Note: Again, you may be prompted again to install WGA Notification, so it must be bypassed.

Third Method updated

This method involves using a cracked version of LegitCheckControl.dll to replace the original copy of LegitCheckControl.dll, and thus bypass the WGA validation and make Microsoft believes that your copy of Windows is genuine. To get rid of WGA Notifications warning messages, the patched version of WgaLogon.dll and WgaTray.exe to replace the existing files.

To apply the patch by replacing the files manually, try to end the respective processes in the Task Manager before deleting the existing files. Most likely is you will have to restart your PC in Safe Mode in order to replacing the original copy of LegitCheckControl.dll and related files. However, there has been automatic updater and even cracked WGA installer that automatically apply the patched version of WGA files.

How to Find and Change Windows Product Key and Registration Information

How to Find and Change Windows Product Key and Registration Information

June 22, 2009
Magical Jelly Bean Keyfinder is freeware utility by which you can you do the following:
Find your Windows 95, 98, ME, NT4, 2000, XP, Server 2003, Windows Vista product keys.
Find your Windows 95, 98, ME, NT4, 2000, XP, Server 2003, Windows Vista registration information.
Change your Windows 95, 98, ME, and XP product key. (Windows 2000, 2003, NT4 and Vista supported)
Change your windows registration information.
Find your Microsoft Office 97, Office XP, and Office 2003 installation key. (Office 2000 not supported).

The screenshots provided below illustrate the process of changing your windows product key and registration information.


Is this software legal?
Yes this legal because Microsoft itself has knowledge base article which describes how to change your windows key and provides the script for this process. This freeware utility utilizes those scripts.

You can download this freeware (File Size: 260Kb):Download 1
Download 2

Disclaimer:
Certain antivirus software like Mcafee and Nod32 consider this file as spyware and delete it, but this file is absolutely harmless you can go ahead and try it.

XP expires

XP expires

June 18, 2009

To reduce instances of "casual copying" (a nice name for software piracy), Microsoft has implemented a two-stage antipiracy scheme in its upcoming OS. The first stage is the installation and registration counter: this lets you install Windows XP only five times on the same system. (Note that you'll be able to install the final version of XP on only one machine, as opposed to the current beta, which can be installed on five machines for testing purposes.) The second stage creates a profile of the system to prevent you from reinstalling or registering the OS on different PCs.

To make this scheme work, you must activate your copy of Windows--over the Internet or by calling for an activation code--within 30 days of installation. Activation differs from a classic registration process in that no personal information is requested by or sent to Microsoft, just a record that a specific copy of Windows XP is installed on your specific PC. If you fail to activate your copy of the OS within 30 days, your login will fail. (Since XP is based on Windows NT-like privilege levels, you can't use your computer until you log on.)

Microsoft says the scheme should not prevent you from reinstalling your copy of XP on your PC as many times as you need to, as long as it's the same PC or close to it, allowing for some hardware changes. It's the "some" that has most folks worried. In theory, you might have to reactivate your OS if you upgrade significantly or swap out a lot of components because XP might think it's running on a new PC. So far, Microsoft isn't saying what system information the OS uses to determine the "same PC or close to it" status. That means we don't know to what degree you can upgrade your hardware before you cross the invisible line. We also don't know how much, if any, personally identifiable data Microsoft is gathering from your PC.

Microsoft says you can, of course, change at least one and possibly several hardware components--RAM, video or sound cards, CPUs, motherboards, and so on--without having to reactivate your OS. But if you try to reinstall your copy of Windows XP on what Microsoft calls a "different or significantly upgraded or changed PC" (again, the company declined to specify how different), the activation will most likely be rejected, requiring you to call Microsoft to explain and get a new (free) activation code.

Microsoft plans to set up a new call center for U.S.-based customers to expedite activation issues. Many non-U.S. customers will likely have to go through the existing, shared Microsoft technical support lines they currently use. Microsoft says it expects only 2 percent of the total installed base of Windows XP to have to reactivate the OS. Whether the anti-piracy initiative will present problems for consumers or result in fewer upgrades to XP remains to be seen. Remember, the final release is at least a few months off.

Automated System Recovery

Automated System Recovery

June 18, 2009
This tip will attempt to show you how to set up and use Automated System Recovery in Windows XP.
ASR is a two–part system of recovery:
1.ASR backup
2.ASR restore.
You should make Automated System Recovery (ASR) sets regularly as part of your plan for system recovery in case of it failing.
IMPORTANT: ASR should be a last resort for system recovery, it should be used only after every other option has been exhausted, such as Safe Mode Boot and Last Known Good Configuration.
1. ACCOMPLISHING THE ASR BACKUP
The backup part uses the ASR Wizard located in Backup to complete this task. The wizard backs up:
the system state
system services
and all disks associated with the operating system components.
It also creates a file containing:
information about the backup
the disk configurations (including basic and dynamic volumes)
and how to accomplish a restore.
HERE'S HOW TO CREATE AN ASR SET USING BACKUP
1.You will need a blank floppy disk to save your system settings and media to contain the backup files.
2.To open Backup. Click Start-->All Programs-->Accessories-->System Tools-->then click Backup. The Backup Utility Wizard starts by default, unless it is disabled.
3.Click the Advanced Mode button in the Backup Utility Wizard.
4.On the Tools menu-->click ASR Wizard.
5.Follow the instructions that appear on your screen.
IMPORTANT: Only those system files necessary for starting your system will be backed up using the Backup Utility Wizare.
HOW DOES ASR WORK?
You can get to the restore portion by pressing F2 when prompted in the text–mode portion of setup. Automated System Recovery will read the disk configurations from the file that it creates and restore all of the disk signatures, volumes and partitions necessary, so that, at least, you'll be able to start the computer. Although, under some circumstances, it might not be able to restore all of the disk configurations. ASR then installs a simple installation of Windows and automatically starts restoring using the backup that was created by the Wizard.
RECOVERING FROM A SYSTEM CRASH USING ASR
Here's how:
1.Make sure you have the following items before you begin:
Your previously created Automated System Recovery (ASR) floppy disk.
Your previously created backup media.
The original Windows XP installation CD.
2.Insert the Windows XP installation CD into your CD/DVD drive.
3.Restart your PC. If prompted to press a particular key in order to start the computer from CD, do so.
4.Press F2 when prompted during the text–only mode section of Setup. You will be prompted to insert the ASR floppy disk you have previously created.
5.Follow the directions on the screen.
Important To Remember:
ASR will not put back your data files.
McAfee Command Line Tool for removing Virus

McAfee Command Line Tool for removing Virus

June 18, 2009
Follow the steps to clean Virus:

1) Click Here to Download a File (Download) (OR) Go to the following link
http://www.mcafee.com/apps/downloads/security_updates/superdat.asp?region=us&segment=enterprise
I. Select SDAT tab
II. Click on sdat5598.exe and save the file
NOTE: Verify that the file should be more than 100MB
2) Create a folder SDAT at c:\
3) Copy the file into SDAT folder.
4) Turn off System Restore on All Drives.
I. To turn off System Restore Do the Following.
II. Right Click on My Computer icon on Desktop Select Properties.
III. Select System Restore tab, put a click on Check box and click ok
5) Reboot the System and Press F2/F8/ or whatever your computer document suggest when the POST begins but before Windows start.
6) Select Safe Mode and allow the system to boot in Safe Mode.
7) Click START Select Run and type CMD to get Command Console.
8) Type cd \SDAT.
9) Type sdat5598.exe /e at command console .
10) This Command will Extract 19 files.
11) After Extracting all files Type "scan /adl /all /clean" Command.
12) This Will Clean virus from your system.
13) After Completing scanning restart your computer Normal Mode.
14) Turn on System Restore point (For this user Point 4)
System Restore Window
Using sfc /scannow for your windows repair

Using sfc /scannow for your windows repair

June 18, 2009

Self File Protection System In Windows

Windows XP has the ability to protect itself from system instability caused by the overwriting important system files. This is a problem with Windows 95 and Windows 98. With the introduction of Windows Millennium Edition, Microsoft made a strong effort to stop this from happening. Now, in Windows XP, there is a much better protection of these important files. This system is called Windows File Protection


Windows File Protection is always enabled and allows Windows digitally signed files to replace existing files safely. If you introduce a file replacement in any other way, Windows File protection will overwrite your file!


An important part of Windows File Protection is the command line utility: System File Checker (sfc.exe) This is a great tool for troubleshooting Windows XP problems.


The main reason for using this utility is when you suspect there may be a problem with a Windows XP system file. Perhaps you get a dialog box appear informing you of a problem with a .dll file, or your program will just not load! It is therefore worth checking to see if there are any corrupt system files using scannow sfc.


To do this simply go to the Run box on the Start Menu and type in: sfc /scannow


This command will immediately initiate the Windows File Protection service to scan all protected files and make sure of their correctness, replacing any files that it finds with a problem.


Note : Make Sure That OS CD On Drive.


A box should appear to give an indication of how long the process is taking.

If all goes as it should, any corrupt, missing or incorrect files would be replaced by this process. However, as with most actions in this world, things can go wrong and the following should help!


The most frequent complaint with scannow /sfc is that a dialog box appears asking you to insert your Windows XP CD-ROM to continue.


Why Does This Happen ?


There are several settings in your computer's registry that are checked when you run scannow /sfc.


As stated before, the Windows File Protection constantly monitors for any changes to the main system files. These are usually stored in:C:WINDOWSSystem32Dllcache (C: in most cases is the root drive) The dllcache folder is extremely important so Windows XP hides it from you! To view it go to:


My Computer -> Tools -> Folder Options -> View -> "uncheck" Hide protected operating system files.


There is normally no need for the original XP CD to be inserted as your computer has a copy it can get hold of in this cache.


But, if the Dllcache folder, or part of it, has become corrupted for some reason then you will be prompted for the XP CD - so your computer can get a clean copy!


However, not ALL installations of Windows XP have ALL the system files cached into this folder! You may only have around 25-50MB of files in this folder under Windows XP depending on the settings in the registry.
If your Task Manager is Disabled

If your Task Manager is Disabled

June 18, 2009
Main

1) Click "Start" Button
2) Select "Run"
3) Type "regedit"

4)Navigate HKEY_CURRENT_USER\Software\Microsoft\Windows\CurrentVersion\Policies\System
5) After Point System Check in the right pane for Disabletaskmgr, if you find it double click and change the D-word Valu to zero(0)
6) Close the regedit and restart system
7) Last but not Least When ever if u find any errors like this, That means Your System is infected with Virus. Better Update your anti virus software.

OR

Method 1 - Using the Group Policy Editor in Windows XP Professional

  1. Click Start, Run, type gpedit.msc and click OK.
  2. Under User Configuration, Click on the plus (+) next to Administrative Templates
  3. Click on the plus (+) next tSystem, then click on Ctrl+Alt+Delete Options
  4. Find Remove Task Manager in the right-hand pane and double click on it
  5. Choose the option "Not Configured"  and click Ok. 
  6. Close the Group Policy Window
Method 2:  Change the Task Manager Option through the Run line
  1. Click on Start, Run and type the following command exactly and press Enter
REG add HKCU\Software\Microsoft\Windows\CurrentVersion\Policies\System /v DisableTaskMgr /t REG_DWORD /d 0 /f

Method 3: Change Task Manager through a Registry REG file
  1. Click on Start, Run, and type Notepad and press Enter
  2. Copy and paste the information between the dotted lines into Notepad and save it to your desktop as taskmanager.reg
------------------------------------
Windows Registry Editor Version 5.00

[HKEY_CURRENT_USER\Software\Microsoft\Windows\CurrentVersion\Policies\System]
"DisableTaskMgr"=dword:00000000
-------------------------------------

      3. Double click on the taskmanager.reg file to enter the information into the Windows registry

Method 4: Delete the restriction in the registry manually
  1. Click on Start, Run, and type REGEDIT and press Enter
  2. Navigate to the following branch
    HKEY_CURRENT_USER \ Software \ Microsoft \ Windows \ CurrentVersion \ Policies\ System
  3. In the right pane, find and delete the value named DisableTaskMgr
  4. Close the registry editor
Search Option Not Working

Search Option Not Working

June 18, 2009
Do the Following to restore your search option
1) Click Start and then Run
2) Run the following files
I. regsvr32 wshom.ocx
II. regsvr32 jscript.dll
III. regsvr32 urlmon.dll
3) Then you will see that your search engine works normally
Help Desk and Asset Management software for IT People

Help Desk and Asset Management software for IT People

June 18, 2009
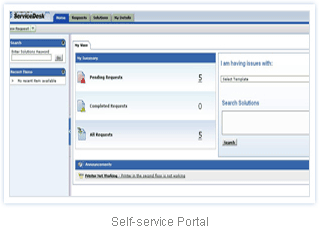
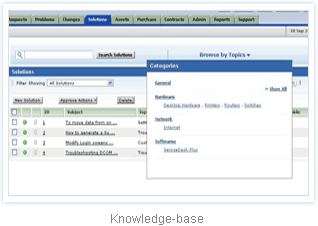
ServiceDesk Plus is a web-based helpdesk software that helps you manage all your communications from a single point. It offers an integrated Request management (Trouble Ticketing), Asset management, Purchase order management, Contract Management, Self-Service Portal, and Knowledge Base.

ServiceDesk Plus Features

Helpdesk Management

ServiceDesk Plus help desk management gives you everything to manage your help desk requests effectively. It includes self-service portal, knowledge base, auto routing of requests, notifications, sla management,email integration, LDAP, AD integration, API integration, custom request form,user survey, flash reports, multi-site support, help desk reporting.

IT Help Desk Software-Self Service Portal

IT Help Desk Software-Knowledge Base
  • Self-service portal to enable login for users to submit their trouble tickets
  • Web-based knowledge-base system for users and technicians to search and add the troubleshooting docs
  • NMS Integration to integrate with Network Monitoring Software for tracking events and network failures
  • Service Level Agreements to set escalation levels for the SLA violations
  • Multi-site functionality to manage requests, assets and technicians separately for different sites in your organization
  • Email Integration to handle all the help desk emails sent by the users
  • Notification alerts via email or sms, to inform users or technicians for request handling
  • Request scheduling to manage and track the preventive maintenance tasks
  • API integration to integrate your web-based help desk software with any third-party software
  • Active Directory integration to enable user authentication with single sign-on functionality
  • Robo technician to automate the "reset password requests"
  • Request survey to know the technician competent level and user satisfaction level on request resolutions
  • Flash Reports to get a consolidated view on what is happening with your helpdesk
  • Help Desk Reports to schedule and review the reports based on Request-status, SLA-violation and many more from the list of default reports or to create your own custom reports

Where ever you can browse this software using URL in LAN.

like : " http://:8080

Ex.: http://172.16.1.1:8080

AdventNet ManageEngine ServiceDesk Plus here you can download

Download Here
Fast Duplicate File Finder Detects Extra Copies on Hard Disk Space

Fast Duplicate File Finder Detects Extra Copies on Hard Disk Space

June 18, 2009
H is a Free Software utility that you can consider. Named as Fast Duplicate File Finder, it will able to help you identify duplicated copies in your hard disk drives and allow you to delete them, freeing up the hard Disk Space more optimized PC performance.

Once install and launch the utility, it will bring you to a simple GUI. Without complicated setup guide, users just need to select and add those folders that are intended to be scanned for duplicated files. Under the option, users can select to tick on the ‘Scan subfolders’ so that all of the sub directories will be covered without miss. It may take some times for all the files to be scanned through depending on your file and folder size. Good thing is, the utility will able to list down all the duplicated files with preview capability so that users can decide if to delete them straight away.

The utility consumes around 1.6MB and is suitable to be used on any Windows OS. If you think this is useful, just download it here to figure out how much space you are able to save after deleting the duplicated copies.

Restart or Shutdown Windows (XP, 2000 and Vista) from Command Line or One-Click Shortcut

June 17, 2009
In order to shutdown or restart the Windows with just one click shortcut or from command line, users can use shutdown command line utility/command that comes with Windows 2000 (with the Resource Kit installed) and Windows XP or Windows Vista (native). To access shutdown command, simply go to DOS command prompt by clicking on Start -> All Programs -> Accessories -> Command Prompt or Start -> Run and then type in Cmd to launch a command prompt window.

Type shutdown -s -t 01 Here "01" Means time for shutdown in no. of Seconds.

If you want brief discription for shutdown command

Type
shutdown /? in command line


How To Monitor for Unauthorized User Access in Windows 2000

How To Monitor for Unauthorized User Access in Windows 2000

June 17, 2009
Summary:

This article describes how to monitor your system for unauthorized user access. There are two main steps: Enabling security auditing and viewing the security logs. Note that different systems have different security needs, and the security topic is complex. Any user who sets up security audits on your system must be assigned to administrative groups or be given security rights and privileges.


How to Enable Security Auditing

You set up security auditing differently depending on whether the computer is a standalone computer or a domain controller.

Standalone Servers, Member Servers, or Windows 2000 Professional

  1. Click Start, click Run, type mmc /a, and then click OK.
  2. On the Console menu, click Add/Remove Snap-in, and then click Add.
  3. Under Snap-in, click Group Policy, and then click Add.
  4. In the Select Group Policy Object box, click Local Computer, click Finish, click Close, and then click OK.
  5. In the Local Computer Policy box, click Computer Configuration, click Windows Settings, click Security Settings, click Local Policies, and then click Audit Policy.
  6. In the details pane, click Audit logon events.
  7. Click Action, click Security, select Unsuccessful logon attempts, and then click OK.

Windows 2000-Based Domain Controllers

  1. Click Start, point to Programs, point to Administrative Tools, and then click Active Directory Users and Computers
  2. In the console tree, click Domain Controllers.
  3. Click Action, and then click Properties.
  4. Click the Group Policy tab, click Default Domain Controllers Policy, and then click Edit.
  5. Click to expand Computer Configuration, Windows Settings, Security Settings, Local Policies, and then Audit Policy.
  6. In the details pane, click Audit logon events.
  7. On the Action menu, click Security, click to select the Define these policy settings check box, click to select the Failure check box, and then click OK.

How to View Security Logs

  1. Click Start, point to Programs, point to Administrative tools, and then click Event viewer.
  2. In the console tree, click Security log.
  3. Look in the details pane for information about the event you want to view, and then double-click the event.

Troubleshooting

  • If your computer is connected to a network, security logging may be restricted or disabled by a network policy.
  • The security log is limited in size; carefully select the events to be audited and consider the amount of disk space you are willing to devote to the security log.
  • If security auditing is enabled on a remote computer, you can view the event logs remotely with Event Viewer. Start a Microsoft Management Console (MMC) console in Author mode, and then add Event Viewer to the console. When you are prompted to specify which computer the snap-in will manage, click Another computer, and then type the name of the remote computer.
  • Security auditing for workstations, member servers, and domain controllers can be enabled remotely only by domain administrators. To do this, create an organizational unit, add the appropriate machine accounts to the organizational unit, and then use Active Directory Users and Computers to create a policy to enable security auditing.
How to determine whether users changed their passwords before an account lockout

How to determine whether users changed their passwords before an account lockout

June 17, 2009
Summary :

This step-by-step article describes how to determine whether users changed their passwords before an account lockout. You may want to configure an audit account management policy to determine whether users changed their passwords before an account lockout occurred. This policy may be useful when users forget their new passwords, or when users continue to use their old passwords.


Audit Account Management in Microsoft Windows 2000 Server and Windows Server 2003

  1. Click Start, and then click Run.
  2. In the Open box, type mmc, and then click OK.
  3. On the Console menu, click Add/Remove Snap-in, and then click Add.
  4. In the Add Standalone Snap-in dialog box, click Group Policy, click Add, click Finish, click Close, and then click OK.
  5. Double-click Local Computer Policy, and then double-click Computer Configuration.
  6. Double-click Windows Settings, and then double-click Security Settings.
  7. Double-click Local Policies, and then double-click Audit Policy.
  8. In the right pane, double-click Audit account management.
  9. In the Local Security Policy Setting dialog box, click to select the Success and the Failure check boxes, and then click OK.
  10. Click Start, point to Programs, point to Administrative Tools, and then click Event Viewer.
  11. Click Security Log, and then in the right pane, double-click Success Audit or Failure Audit.


Audit Account Management in Microsoft Windows NT 4.0

  1. Click Start, point to Programs, point to Administrative Tools, and then click User Manager for Domains.
  2. Click Policies on the menu bar, and then click Audit.
  3. Click Audit These Events.
  4. Click to select the Failure check box for the Logon and Logoff event.
  5. Click to select the Success and the Failure check boxes for the User and Group Management event, and then click OK.
  6. Click Start, point to Programs, point to Administrative Tools, and then click Event Viewer.
  7. Click Log on the menu bar, and then click Security.
*******************************************************
The following is an example an account management event:


Event Type: Success Audit
Event Source: Security
Event Category: Account Management
Event ID: 642 Date: 8/12/2008
Time: 3:13:33 PM
User: CONTOSO\administrator
Computer: CONTOSO-DCB
Description: User Account Changed:
Target Account Name: t
Target Domain: CONTOSO
Target Account ID: CONTOSO\t
Caller User Name: administrator
Caller Domain: CONTOSO
Caller Logon ID: (0x0,0x233FF)
Privileges: -
Changed Attributes:
Sam Account Name: -
Display Name: - User
Principal Name: -
Home Directory: -
Home Drive: -
Script Path: -
Profile Path: -
User Workstations: -
Password Last Set: 8/12/2008 3:13:33 PM
Account Expires: -
Primary Group ID: -
AllowedToDelegateTo: -
Old UAC Value: -
New UAC Value: -
User Account Control: -
User Parameters: -
Sid History: -
Logon Hours: -
**************************************************
How to track users logon/logoff

How to track users logon/logoff

June 17, 2009

The Auditing


Option 1:

1. Enable Auditing on the domain level by using Group Policy:

Computer Configuration/Windows Settings/Security Settings/Local Policies/Audit Policy

There are two types of auditing that address logging on, they are Audit Logon Events and Audit Account Logon Events.

Audit "logon events" records logons on the PC(s) targeted by the policy and the results appear in the Security Log on that PC(s).

Audit "Account Logon" Events tracks logons to the domain, and the results appear in the Security Log on domain controllers only


2. Create a logon script on the required domain/OU/user account with the following content:

echo %date%,%time%,%computername%,%username%,%sessionname%,%logonserver% >>
\\SERVER\SHARENAME$\LOGON.LOG

3. Create a logoff script on the required domain/OU/user account with the following content:

echo %date%,%time%,%computername%,%username%,%sessionname%,%logonserver% >>
\\SERVER\SHARENAME$\LOGOFF.LOG


Note: Please be aware that unauthorized users can change this scripts, due the requirement that

the SHARENAME$ will be writeable by users.


++++++++++++++++++++++++++++++++++++++++++++++++++++++++++++++++++++

Option 2:


Use WMI/ADSI to query each domain controller for logon/logoff events.
Technical help for a system administrator: RAID 5 overview

Technical help for a system administrator: RAID 5 overview

June 16, 2009
Technical help for a system administrator: regedit not opening

Technical help for a system administrator: regedit not opening

June 16, 2009
Technical help for a system administrator: Disabling USB storage on a Windows platform

Technical help for a system administrator: Disabling USB storage on a Windows platform

June 16, 2009
Technical help for a system administrator: Mcafee antivirus ( Virusscan 8.5 ) 8.5

Technical help for a system administrator: Mcafee antivirus ( Virusscan 8.5 ) 8.5

June 16, 2009
Technical help for a system administrator: RAID 10 overview

Technical help for a system administrator: RAID 10 overview

June 16, 2009
Technical help for a system administrator: Windows key finder software

Technical help for a system administrator: Windows key finder software

June 16, 2009

Multi Ping batch file script

June 03, 2009
If you want ping for multi ip address and know the status in log file
This script will help you a lot
copy this all script in a notepad
save as ping.bat file on desktop

And create a computers.txt text document in c:\ ( C drive)
Here give required IP address in computers.txt file
Like


Now You can ping and check the status N number of ip's at a time.

open ping.bat file which is saved on desktop

Its going to ping all ips and open a new log file with the status of all ip's


Its really helpful to system and network administrators.


@echo off
(Set InputFile=c:\Computers.txt) title,Pinging list of computers &color 9e ::datestamp for /f "tokens=2-4 skip=1 delims=(-./)" %%i in ('echo.^|date') do ( for /f "tokens=1-4 delims=-./ " %%m in ('date /t') do ( (set dow=%%m)&(set %%i=%%n)&(set %%j=%%o)&(set yy=%%p) ) ) For /F "tokens=1,2 delims=:, " %%i in ('TIME /T') Do (Set HHMM=%%i%%j) (Set OutputFile=c:\Pinglog %yy%-%mm%-%dd% %HHMM%.txt) If Exist "%OutputFile%" Del "%OutputFile%" For /F "eol=;" %%* in ('type "%InputFile%"') do ( >>"%OutputFile%" (echo.&echo.---------------&( echo.%%*;&(ping -a -n 2 -w 750 %%* | Find ".")) )&echo.done %%*,) ::check start notepad.exe %OutputFile%