The System Restore feature in Windows is useful for restoring your PC back to older settings in case some application or settings start hampering its functioning.

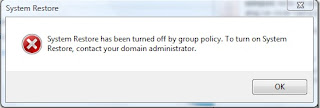
If you get the error, “ System Restore has been turned off by group policy. To turn on System Restore, contact your domain administrator “ while trying to access system restore then it could be possible that your firm’s IT department(if it’s your office workstation) has blocked it, or it got turned off automatically due to some reason.
Step 1. Click Start button, click Run and type gpedit.msc.
Step 2. Expand Computer Configuration and then expand Administrative Templates.
Step 3. Expand System, and then click System Restore.
Step 4. Double click on Turn off System Restore.
Step 5. On the Setting tab, select Disabled.
Step 6. Double-click Turn off Configuration, and then on the Setting tab, select Disabled.
Step 7. Exit the editor and reboot your PC.
Step 1. Press Start start button. Click Run. Type regedit and click OK.
Step 2. On the registry editor double click on HKEY_LOCAL_MACHINE folder to expand it.
Step 3. Expand SOFTWARE folder.
Step 4. Expand Policies> Microsoft> Windows NT> SystemRestore.
Step 5. On a right panel right click on DisableConfog and DisableSR and select delete option from right hand menu.
Step 6. Exit the editor and reboot your PC.
These two method are work well on home editions and professional versions of Windows XP and higher.
After restarting your PC, Go to start button and type System Restore in a search box (In Windows 7,8, Vista).
That was how you resolve System Restore disabled by group policy error in Windows.

If you get the error, “ System Restore has been turned off by group policy. To turn on System Restore, contact your domain administrator “ while trying to access system restore then it could be possible that your firm’s IT department(if it’s your office workstation) has blocked it, or it got turned off automatically due to some reason.
Error Resolved with following simple steps.
Method 1:
Enable System Restore Configuration Interface through Group Policy Editor.
Step 1. Click Start button, click Run and type gpedit.msc.
Step 2. Expand Computer Configuration and then expand Administrative Templates.
Step 3. Expand System, and then click System Restore.
Step 4. Double click on Turn off System Restore.
Step 5. On the Setting tab, select Disabled.
Step 6. Double-click Turn off Configuration, and then on the Setting tab, select Disabled.
Step 7. Exit the editor and reboot your PC.
Method 2:
Note: Make sure that you backup your registry using File->Export before you attempt to make any changes.Step 1. Press Start start button. Click Run. Type regedit and click OK.
Step 2. On the registry editor double click on HKEY_LOCAL_MACHINE folder to expand it.
Step 3. Expand SOFTWARE folder.
Step 4. Expand Policies> Microsoft> Windows NT> SystemRestore.
Step 5. On a right panel right click on DisableConfog and DisableSR and select delete option from right hand menu.
Step 6. Exit the editor and reboot your PC.
These two method are work well on home editions and professional versions of Windows XP and higher.
After restarting your PC, Go to start button and type System Restore in a search box (In Windows 7,8, Vista).
System Restore window will appear now.
That was how you resolve System Restore disabled by group policy error in Windows.
