Showing posts with label Configurations. Show all posts

Free Hyper V Configuration Tool by manageengine

June 13, 2015
Free Hyper V Configuration Tool
Virtual servers provide great cost benefits as opposed to real physical server. This encourages people to run many applications and services on these virtual servers. The application, that is running within the virtual servers need to be running all the time. Sometimes, during emergency situations, few VM's require more resources to manage the demanding, resource intensive applications running on them. In that critical moment, it becomes imperative to allocate more resources, such as CPU, RAM to that VM's. Hence, it is important to monitor and manage those virtual servers(VM's) continuously at all the times
The ManageEngine's Free Hyper V Configuration tool addresses this monitoring and management requirement. The Free software can configure Microsoft Hyper V Virtual server (VM's ) resources such as CPU, RAM or execute Power operations or change the boot order start-up, and also it fetches comprehensive data about the servers and its virtual machines and presents them as visually elegant graphs and reports in a desktop tool dashboard.
Manage Engine Hyper-V Configuration Tool can configure Hyper V Server from the remote location. The best part is that the tool is made available to you absolutely FREE of cost.

Features:
·  Easy to use dashboard tool
·  Hyper V server – CPU , Memory, Disk Monitoring
·  Virtual server (VM) – CPU configuration
·  Virtual Machine (VM) – RAM configuration
·  Power on, Suspend, Power–off VM from remote
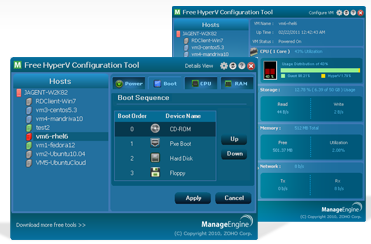
Key Benefits
ManageEngine Free Hyper V Configuration Tool provides an exclusive configuration solution for Hyper-V server, a Virtual Machine, running on Windows 2008 R2. Using the free tool, the administrator can increase or decrease the RAM capacity, or allocate more number of CPU processor for the VM, or execute 'power operations' on the Virtual servers like 'power-on' the VM's , suspend the VM's , 'Power Off' the VM and Pause the VM, and it allows the operator to select the Boot-order for each VM', either it may be from Disk, CD Rom, Pxe boot and more.
Tool populates actual resource utilization details of the virtual servers along with CPU usage, Memory details, Disk and Network utilization of each guest operating system. The dashboard quickly shows how many virtual machines are present, how many are powered-on / powered-off or suspended state and displaying its severity as Critical or Warning in a elegant Tree-View, and also, how much CPU are allocated to / consumed by each Virtual Machine etc., in an intuitive bar graph.
The ManageEngine Hyper V Configuration Tool serves as a smart desktop tool that continuously monitors Hyper V, a Microsoft virtual server, across your network and more importantly, it empowers you to manage / configure those VM's in real-time and ensures your mission-critical applications run smoothly.

Download ManageEngine Hyper V Configuration Free Tool 1.0

 3 MB)
Note: Please read and accept the License Agreement before downloading the software


Gmail via Outlook for Windows and Mac - Step to Step Configuration

November 20, 2013
Google Mail (GMAIL) via Outlook for Windows and Mac - Step to Step Configuration
Here is another tip for Gmail Users, Now you can configure Gmail in your MS office Outlook with more handy, Our Step by Step Guide will differently help even Beginners/Dummies much easier,

Promotion for India: Check out Online Shopping Deals, Coupon & Lowest Price Products from Our Price Comparison Web Site - http://www.dealdimer.com


  To configure Outlook for Windows so it can retrieve Google Mail: 
  1. In Outlook, choose the File tab.
  2. In the File window, click the Add Account button.
  3. In the Add Account window, choose the option "Manually configure server settings or additional server types." Click the Next button.
  4. Choose the Internet E-mail option. Click Next.
  5. On the Internet E-mail settings windows, enter the following information:
    • Name: Enter your first and last name.
    • E-mail Address: uniqname@umich.edu
    • Account Type: IMAP
    • Incoming mail server: imap.gmail.com
    • Outgoing mail server: smtp.gmail.com 
    • User Name: uniqname@umich.edu
    • Password: use your Kerberos password unless you have changed your Google password manually
  6. Click More settings.
  7. On the Advanced tab, in the  Incoming server (IMAP) section, choose SSL from the drop-down list. The port number will change to 993. 
  8. In the Outgoing server (SMTP) section, choose TLS from the drop-down list. Change the port number to 587.
  9. Select the Outgoing Server tab.
  10.  Select the box My outgoing SMTP server (SMTP) requires authentication. Leave the Use same settings as my incoming mail server option selected. 
  11. Click OK.
  12. Click Next. Outlook will send a test message to verify your account settings. 
  13. Click Close.
  14. Click Finish.
Outlook will begin downloading mail information. If you have a large mailbox, this could take a few minutes.


   To configure Outlook 2011 for Macintosh so it can retrieve Google Mail:  
  1. In Outlook, choose the Tools menu at the top of the screen (NOT the Tools ribbon in the Outlook window).
  2. From the Tools menu, choose Accounts.
  3. In the lower left corner of the Accounts dialog box, choose the Add menu (it looks like a plus sign [+]), and then choose E-mail.
  4. Enter your Kerberos email and password (unless you have changed your Google password manually), and choose Add Account.
  5. The dialog box will expand. Enter the following information:
    • User Name: Enter your Kerberos email.
    • Type: IMAP
    • Incoming mail server: imap.gmail.com 
    • Incoming mail server: "Use SSL to connect (recommended)"--click checkbox. The port number will change to 993. 
    • Outgoing mail server: smtp.gmail.com 
    • Outgoing mail server: "Override default port"--click checkbox. Go back one field and change the port number to 587.
    • Outgoing mail server: "Use SSL to connect (recommended)"--click checkbox
  6. Click Add Account.
  7. Click More Options (in the "Outgoing server:" section). A dialog box will open.
  8. From the Authentication combo box, choose Use Incoming Server Info.
  9. Click OK.
  10. Close the Accounts dialog box.
Outlook will begin downloading mail information. If you have a large mailbox, this could take a few minutes.


How to Activate GodMode in Windows 7

How to Activate GodMode in Windows 7

February 21, 2012
Want to activate GodMode in Windows 7? Here's how!
Windows 7 users are all abuzz about the OS and its GodMode. If you haven't heard of it, GodMode is a feature that was revealed by CNet's Microsoft Correspondent, Ina Fried. GodMode is a folder that brings together a long list of customization settings allowing you to change all your settings from one place. Neat huh? It's very easy to enable and damn useful if you tweak things around a lot.
I've broken it down into five-step process to avoid confusion:
Step 1: Right click.
Step 2: Click create folder.

Step 3: Name your sparkly, new folder this, "GodMode.{ED7BA470-8E54-465E-825C-99712043E01C}" and press enter.
Step 4: Blink as the folder changes form to look like the control panel.
Step 5: Open the folder and bask in all your godly, control panel-y power.
Upgrade from Windows Server 2003 Domain Controller to Windows Server 2008

Upgrade from Windows Server 2003 Domain Controller to Windows Server 2008

February 07, 2012


Introduction

I have been using Windows Server 2003 for years and I believe its time to shift and try using Windows Server 2008, I have downloaded RC0 and decided to Upgrade my Domain Controller, which is also a DNS & DHCP Server to Windows Server 2008 Standard Edition RC0. In this article, I will show you step by step how to perform an in-place upgrade for a Domain Controller from Windows Server 2003 To Windows Server 2008 RC0

Note: This article was written when Windows Server 2008 was still RC0. Changes might occur later once the product is RTM'd Upgrade Steps
  1. On you Windows Server 2003 DC, insert the Windows Server 2008 DVD, and then open command prompt and run the following commands, make sure first to browse to the adprep directory inside the Windows 008 DVD , in my case case, the F drive is the DVD Drive letter, so to browse to the adprep directory I would write the following inside cmd:cd f:\sources\adprerp

    adprep/ forestprep

  • adprep/ domainprep
  • adprep/ rodcprep (Optional, if you plan to add a Read Only Domain Controller Later)


  1. If the Install Windows page did not auto run before the previous step, double click on your DVD drive where you have inserted the Windows Server 2008 DVD, then Click on Install now
  2. A please wait screen will be followed, then a page to decide what to do, either to go online and get the latest updates for installation or to skip going online by clicking on the Do not get the latest updates for installation option


    I will perform the updates later, so for the purpose of this article, I will click on Do not get the latest updates for installation

  3. Enter the product key, click Next

  4. Accept the license terms and click on Next

  5. What we need to do is to upgrade our server, so click on the Upgrade option

  6. The compatibility report will be displayed telling you what hardware might not function once upgrade is completed , also to check with software vendors to check if their software are compatible with Windows Server 2008. click Next

  7. Upgrade is now in process

  8. The Server will be restarted automatically several times, the Upgrade process will continue with the remaining operations:
    • Expanding Files
    • Installing Features and updates
    • Completing Upgrade
  9. After multiple restarts, the Upgrade process will be completed and you will be able to start using your Windows Server 2008.
Summary
In this article, I showed you how to do an in-place upgrade for Windows Server 2003 Domain Controller to Windows Server 2008. The steps are easy and straightforward, just make sure while reading the compatibility report, if any of the hardware/software installed on your Server are compatible with Windows Server 2008.


How to install Turbo C++ on Windows 7

How to install Turbo C++ on Windows 7

October 07, 2011

We are providing detailed procedure how to install Turbo C++ on Windows 7.

Users having Win 7 Proand Win 7 Ultimate should use the virtual Windows XP Mode to install Turbo C++.
Installing Turbo C++ on Windows 7

1. Extract the zip files to: e.g. C:\TurboC


Extract zip files
2. Run the install: C:\TurboC\INSTALL.EXE


Run the install
3. Press Enter to continue


Press Enter to continue
4. Enter the Source drive: e.g.C and press Enter to continue


Enter the Source drive

5. Enter the Source path: \TURBOC and press Enter to continue


Enter the Source path
6. In directories specify where Turbo C files are copied. E.g. C:\TC . When done go to start instalation and press Enter


Specify where Turbo C++ files are copied
7. Succesfull instalation


Succesfull instalation

8. First launch from your destination e.g. C:\TC\BIN\TC.EXE
How to install Turbo C++ on Windows 7 64bit

How to install Turbo C++ on Windows 7 64bit

October 07, 2011

Providing step-by-step procedure how to install Turbo C++ on 64 bit Windows 7.

1. Install the software DOSBox ver 0.73 : download here

2. Create a folder,for example „Turbo“ (c:\Turbo\)

3. Download and extract TC into the Turbo folder (c:\Turbo\): download here

4. Run the DOSBox 0.73 from the icon located on the desktop:


5. Type the following commands at the command prompt [Z]: mount d c:\Turbo\ [The folder TC is present inside the folder Turbo]

Now you should get a message which says: Drive D is mounted as a local directory c:\Turbo\


6. Type d: to shift to d:


7. Next follow the commands below:

cd tc
cd bin
tc or tc.exe [This starts you the Turbo C++ 3.0]


8. In the Turbo C++ goto Options>Directories> Change the source of TC to the source directory [D] ( i.e. virtual D: refers to original c:\Turbo\ . So make the path change to something like D:\TC\include and D:\TC\lib respectively )

How to start TurboC++ in the DOSBox automatically:

You can save yourself some time by having DOSBox automatically mount your folders and start TurboC++:
For DOSBox versions older then 0.73 browse into program installation folder and open the dosbox.conf file in any text editor. For version 0.73 go to Start Menu and click on “Configuration” and then “Edit Configuration“. Then scroll down to the very end, and add the lines which you want to automatically execute when DOSBox starts.

Automatically mount and start Turbo C++3.0 in DOSBox ver 0.73:


Scroll down to the very end, and add the lines:


Those commands will be executed automatically when DOSBox starts!

Please note:

Full screen: Alt and Enter

When you exit from the DosBox [precisely when u unmount the virtual drive where Turbo C++ 3.0 has been mounted] all the files you have saved or made changes in Turbo C++ 3.0 will be copied into the source directory(The directory which contains TC folder)

Don’t use shortcut keys to perform operations in TC because they might be a shortcut key for DOSBOX also . Eg : Ctrl+F9 will exit DOSBOX rather running the code .

VIDEO tutorial (there is another setup – original path to Turbo C++ is h:\tc\ and drive H is mounted as drive C:)