Showing posts with label microsoft. Show all posts
7 Best Free Email Clients: Free Replacement for Outlook

7 Best Free Email Clients: Free Replacement for Outlook

June 13, 2015

Here are 7 best free email clients that we have come across. If you use Microsoft Outlook, and want to switch to a free email client, then this list will provide you with good options. All of these are completely free, and full of features.


Thunderbird

Thunderbird is one of the most popular Email client. It comes from the makers of Firefox, and is packed with features. You can use Thunderbird with Gmail, and any other POP3, SMTP, IMAP. Thunderbird also supports email accounts provided by Microsoft Exchange Server.
Comes with tabbed interface to open multiple emails together.
  • Provides good security for your emails.
  • Advanced mail filters.
  • Works on Windows, Mac, and Linux.
  • Download Free Here.

Windows Live Mail

This is a free email client from Microsoft, and is a part of Windows Live suite. This is really good, and has good resemblance with Microsoft Outlook. It supports Hotmail, Gmail, Yahoo Plus, and many more.
  • Sync your calendar with Windows Live Calendar.
  • Access your mails offline as well.
  • Good security features, and spam protection.
  • Download Free Here.
This is a free email client from Yahoo. Unline any other free email client, it has one big advantage – yu can even check your Yahoo mail in Zimbra Desktop. Apart from that, it is extremely easy to configure your accounts in Zimbra Desktop.
  • Native account setup support for Yahoo, Gmail, Hotmail, and AOL.
  • Syncs Zimbra calendar with Yahoo and Gmail calendars.
  • Stores all the contacts in one place.
  • Supports multiple accounts.
  • Download Free Here.

SeaMonkey

SeaMonkey Project
SeaMonkey is a free internet application suite from makers of Firefox and Thunderbird. This is one integrated tool that includes email client, browser, feed reader, IRC Client, and HTML Editor.
  • Emails can be viewed in tabbed format.
  • Junk mail control.
  • Supports multiple email accounts.
  • Download Free Here.

Pegasus Mail

Pegasus Mail LogoThis is one of the oldest email clients. It is very feature rich, and still easy to use. One of the best part of Pegasus Mail client is that it works very well in LAN settings, and has special support for Novell NetWare LANs that allow it to operate intuitively and with almost no maintenance.
  • Supports SMTP, POP3, IMAP4, LDAP, PH.
  • Very secure – comes with advanced protection.
  • Very good spam protection.
  • Small in size, and uses very less system resources.
  • Download Free Here.
eM Client is a full featured communications suite that comes with a powerful email client, integration with Skype, and support for multiple calendars.
  • Native support for Gmail and Google Calendar.
  • Easily import data from MS Outlook, Outlook express, and Thunderbird.
  • Integration with Skype.
  • Download Free Here.
If you have a netbook, Free Mail Commander ideal free email client for you. It uses very less system resources. Still, it is feature packed.
  • Supports multiple aaccounts.
  • Powerful filtering and sorting.
  • Small in size.
  • Uses very less system resources.
  • Download Free Here.


Windows 10: The 10 most important new Consumer Preview features

February 15, 2015
The return of the Start menu is great, but this early build of Windows 10 has a long way to go before it


With a revived and refreshed Start menu, the ability to run Metro apps from the desktop, and more long-requested features, Windows 10 promises to return PC users to the features they knew and loved before Windows 8.
But does it deliver? We just got our first taste to find out.


Microsoft pushed out its Windows 10 Technical Preview to let geeks poke, prod, and critique its fledgling operating system

1) Start menu returns

As soon as we got Windows 10 up and running, we had to play around with the Start menu. Just click on the Windows icon in the bottom left corner of the desktop, and it will pop up like the old one did. It feels like a reunion between a boy and his lost dog. The experience is fresh, yet familiar at the same time.


2) Cortana is here to help. Or will be.


Basic search works just like in Windows 7. By pressing the Windows key on your keyboard, you can pull up the Start menu, and just start typing away. Results will be pulled up from multiple places, including your PC, the Windows Store, and the Internet, much like the Windows 8 Start screen.

3) Another control panel alternative


Windows 8.1 confused many users by introducing a “settings” section of the Metro interface that was mostly redundant with the Control Panel, and could not be accessed as a window. To fix this Microsoft has introduced a new Settings app in Windows 10

4) Entering the Continuum 


One of the most important features new to Windows 10 is Continuum, Microsoft’s attempt to make switching from desktop to tablet, or vice-versa, simple. This is enabled by the way Metro apps work in Windows 10: Any Metro app should be equally at home in full-screen view, or a tiny window consuming just a sliver of the desktop. One tap (or click) switches all open apps between windowed and full-screen view.

5) A buffet of tasty new apps, with more on the way


Microsoft intends to revamp a number of its bundled applications in Windows 10, but only some are available in the preview. These include Photos, Maps and Xbox.

6) New Store, not like the old Store

he way you download and purchase apps has been updated, too, with a revised version of the Windows Store which is currently listed as Store (Beta) in Windows 10. It offers the same selection as the regular store, but it looks much different. Unlike the version in Windows 8.1, which relies on collections of tiles, the Beta update is formatted much like a web page. 
It actually offers less information on screen at once, but better distinguishes the various content on display.

7) Windowed Metro apps in Windows 8


As promised, Metro apps now run in windowed mode in Windows 10. Just open a Metro app and click the familiar window-pane icon in the upper right hand corner of the app, which will toggle between windowed and full screen modes. Clicking and dragging on any of the four edges lets you resize it, just like you would do with any classic desktop app.

8) Charms get baked into Metro apps, for the most part

One of the many reasons that millions of people refused to use Windows 8 was the Charms menu, which, like the Start screen, clashed with the classic desktop UI. The functions contained in the Charms menu, like Search, weren’t the problem themselves. The design and layout were just poorly executed, and helped to make Windows 8 a much more jarring user experience than it had to be.

9) Task View and multiple desktops


Windows 10 can run multiple desktops simultaneously, which, Microsoft claims, allows for even greater multitasking than before. For instance, you might open all your personal apps in one desktop and all your work apps in another, and shift between them as you switch priorities.

10) The Windows 8 Start screen still lives!


Though the new Start menu takes the place of the gigantic old Start screen, you can enable it again by hitting Start, typing “taskbar,” and clicking “Taskbar and Navigation.” Then, click the Start Menu tab, and check off the option labeled “Use the Start menu instead of the Start screen.” Once you hit Apply, Windows 10 will ask you to restart. When you do, you’ll be greeted with the Windows 8 Start screen.


Microsoft launched new video editing app for Windows Phone

February 15, 2015

Microsoft launched new video-editing app for Windows Phone

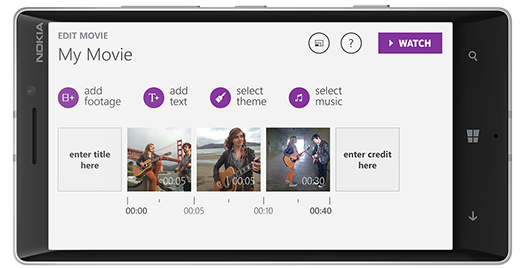
New Video Editing app for Windows tablets & Windows Phone launched From Microsoft Company. Video app can download free from Windows Store & Windows Phone Store. This video editing aap works on lumia tablet, surface tablets and lumia smartphones running windows 8.1. Microsoft plans available to all devices running Windows Phone or Windows 8.1.


Video Editing app You can Movie Creator lets you combine videos, photos, music, and even cinemagraphs (selectively animated photographs) into movies. edit the length of your footage, move clips to different places on your video timeline, captions, add text cards and various filters. First, Microsoft already has a similar app for Windows Phone called Video Tuner — why release another with similar functionality?

You can also possible to pan, rotate, and zoom, like a selection of branded themes featuring characters from popular DreamWorks animated movies like Madagascar and Kung Fu Panda. It only works on the company’s phones and tablets (Lumias and Surfaces), and we’ve updated the article to reflect this.

You can even pan, zoom, and rotate. Your final result can be anywhere from a few seconds to as long as a few hours. Video editing apps usually require in-app purchases to unlock longer videos, but Movie Creator allows free editing of up to 25 videos, photos or cinemagraphs with no length limitations. Microsoft adopting a totally different strategy which has culminated with the free release of Microsoft Office on mobile devices. Microsoft should build apps for Windows Phone and Windows, not just Lumia and Surface.


Gmail via Outlook for Windows and Mac - Step to Step Configuration

November 20, 2013
Google Mail (GMAIL) via Outlook for Windows and Mac - Step to Step Configuration
Here is another tip for Gmail Users, Now you can configure Gmail in your MS office Outlook with more handy, Our Step by Step Guide will differently help even Beginners/Dummies much easier,

Promotion for India: Check out Online Shopping Deals, Coupon & Lowest Price Products from Our Price Comparison Web Site - http://www.dealdimer.com


  To configure Outlook for Windows so it can retrieve Google Mail: 
  1. In Outlook, choose the File tab.
  2. In the File window, click the Add Account button.
  3. In the Add Account window, choose the option "Manually configure server settings or additional server types." Click the Next button.
  4. Choose the Internet E-mail option. Click Next.
  5. On the Internet E-mail settings windows, enter the following information:
    • Name: Enter your first and last name.
    • E-mail Address: uniqname@umich.edu
    • Account Type: IMAP
    • Incoming mail server: imap.gmail.com
    • Outgoing mail server: smtp.gmail.com 
    • User Name: uniqname@umich.edu
    • Password: use your Kerberos password unless you have changed your Google password manually
  6. Click More settings.
  7. On the Advanced tab, in the  Incoming server (IMAP) section, choose SSL from the drop-down list. The port number will change to 993. 
  8. In the Outgoing server (SMTP) section, choose TLS from the drop-down list. Change the port number to 587.
  9. Select the Outgoing Server tab.
  10.  Select the box My outgoing SMTP server (SMTP) requires authentication. Leave the Use same settings as my incoming mail server option selected. 
  11. Click OK.
  12. Click Next. Outlook will send a test message to verify your account settings. 
  13. Click Close.
  14. Click Finish.
Outlook will begin downloading mail information. If you have a large mailbox, this could take a few minutes.


   To configure Outlook 2011 for Macintosh so it can retrieve Google Mail:  
  1. In Outlook, choose the Tools menu at the top of the screen (NOT the Tools ribbon in the Outlook window).
  2. From the Tools menu, choose Accounts.
  3. In the lower left corner of the Accounts dialog box, choose the Add menu (it looks like a plus sign [+]), and then choose E-mail.
  4. Enter your Kerberos email and password (unless you have changed your Google password manually), and choose Add Account.
  5. The dialog box will expand. Enter the following information:
    • User Name: Enter your Kerberos email.
    • Type: IMAP
    • Incoming mail server: imap.gmail.com 
    • Incoming mail server: "Use SSL to connect (recommended)"--click checkbox. The port number will change to 993. 
    • Outgoing mail server: smtp.gmail.com 
    • Outgoing mail server: "Override default port"--click checkbox. Go back one field and change the port number to 587.
    • Outgoing mail server: "Use SSL to connect (recommended)"--click checkbox
  6. Click Add Account.
  7. Click More Options (in the "Outgoing server:" section). A dialog box will open.
  8. From the Authentication combo box, choose Use Incoming Server Info.
  9. Click OK.
  10. Close the Accounts dialog box.
Outlook will begin downloading mail information. If you have a large mailbox, this could take a few minutes.


A very simple free download manager by Microsoft

A very simple free download manager by Microsoft

January 17, 2012

The Microsoft Download Manager enables you to download files simply and easily. It also makes downloading large files such as application and multimedia files quick and reliable.

File Name                                Size
MSDownloadManager.msi     1.3 MB         DOWNLOAD 

The Microsoft Download Manager enables you to download files simply and easily. It also makes downloading large files such as application and multimedia files quick and reliable. It was specifically designed to help users manage file downloads from supporting Microsoft Web sites. Once started, the Microsoft Download Manager’s easy-to-use interface displays the status of downloads and enables you to suspend active downloads or resume downloads that have failed.
System requirements
Supported Operating Systems: Windows 7, Windows Server 2008 R2, Windows Vista Service Pack 2, Windows XP Service Pack 3
The Microsoft Download Manager has specific system requirements in order for it to operate normally. See below for a list of Operating System and Web browser requirements. The Microsoft Download Manager requires one of the following operating systems: Windows© XP with Service Pack 3 Windows Vista© with Service Pack 2 Windows 7 Windows Server© 2008 R2 The Microsoft Download Manager supports the following Web browsers: Windows© Internet Explorer© 6 Internet Explorer 7 Internet Explorer 8 Internet Explorer 9 Mozilla© Firefox© 3.6
Migration from SBS 2003 to SBS 2008 – part 3

Migration from SBS 2003 to SBS 2008 – part 3

August 02, 2011

Migration from SBS 2003 to SBS 2008 – part 3


Once you have finished the setup of SBS 2008 you will need to migrate data and settings over to the new SBS 2008 server. In the SBS 2008 Console there is a “Migrate to Windows SBS” wizard.
Work your way through these wizards and following the instructions. Note that migrating data and mailboxes will effect users so think carefully about when you run these.
These options are discussed further below.
  1. Change where to store data on the destination server

Use this to change where the users redirected folders are stored
  1. Configure the network

Use this to setup TCP/IP info
  1. Configure the Internet Address

This launches the “Setup Your Internet Address” wizard
  • In virtually all cases you will already have a domain name and be managing it externally
  • if you are using a different hostname than “remote” for OWA then you will need to specify this in the “advanced” settings
  1. Migrate network settings


  1. Migrate Exchange mailbox and settings

The Migrate Exchange Server mailboxes/settings will explain how to use the native exchange tools to migrate to SBS 2008. Moving mailboxes may take quite a while depending on how much data is held. If the servers are not connected via Gb connections then you may want to consider using a small gigabit switch to connect the servers to just for the data copy.
  • If desired move the Exchange database to another physical drive (there is a section in the migration wizard that does this)
  • Install the latest service pack – currently exchange 2007 sp3.
  • Enable anonymous connection on the exchange receive connector
  • If you need other systems to relay through this server (which in my experience happens most of the time) create an “allowed relays” receive connector for any smart hosts. Seehere for further info.
  • Check the recipient policy – make sure this matches the policy on the original SBS 2003 server.

  • If you don’t want your iphone users to be forced to create a passcode on their phone disable this options.
  • Move mailboxes
    • I recommend using the “sbs migration” account for this.
    • If you get errors try running the Exchange 2007 BPA permissions test.
  • I recommend backing up the public folders to a pst just in case. Use the export function in outlook for this.
  • Change the exchange server and DC used for recipient update to the new SBS server
  • Change the server that generates the offline address book to the new SBS server
Note – there is a section on decommissioning Exchange in part 4 of this guide.I believe this is best left to the end of the migration

  1. Remove Legacy Group Policy and logon settings

The below group policys are created by SBS2003 and should be removed – they may not all exist in your environment. I recommend just removing the links to them in Active Directory rather than deleting the policies completely. This means you can go back and recover the settings if needed.
  • Small Business Server Auditing Policy
  • Small Business Server Client Computer
  • Small Business Server Domain Password Policy
  • Small Business Server Internet Connection Firewall
  • Small Business Server Lockout Policy
  • Small Business Server Remote Assistance Policy
  • Small Business Server Windows Firewall
  • Small Business Server Windows Vista Policy
  • Small Business Server Update services Client Computer Policy
  • Small Business Server Update Services Common Settings Policy
  • Small Business Server Update Services Server Computer Policy
  1. Migrating Users Shared Data

You may want to switch off the reports if you don’t want your end users getting them.

For the group policies to apply to users and computers…
  • Please ensure all user accounts are found in the Active Directory OU MyBusiness – Users – SBSUsers
  • Likewise all computer accounts should be in MyBusiness – Computers – SBSComputers
Note – you need to run the role wizard for the user accounts to show up in the SBS console
  • Note that this is likely to change group membership. Make sure you make a note of group membership and test this before applying to all users.
  • On the Migrate groups page, click Next.
  • On the Migrate user accounts page, click Run the Change User Role Wizard.
  • Select the desired role and choose “add user permissions or settings”

Select the relevant users or users

  1. Migrate Sharepoint Website

  • Assuming the sharepoint site is in use then please follow the instructions on migrating to the new SBS 2008 server.
  • You can find further info here
    • Move the internal Web site for Windows SBS 2008 migration
    • Steps performed on the Source Server for Windows SBS 2008 migration
    • Steps performed on the Destination Server for Windows SBS 2008 migration

General – Migrating Shared Files and Folders

  • As with moving the mailboxes this may take a while. If the servers are not connected via gigabit connections it might be worth connecting the servers to a small gigabit switch just for the data copy.
  • You will need to copy over any file shares from the old SBS server to the new SBS server.
  • You will need to check the permissions on the new folders
  • To copy the data over I recommend using Richcopy if speed is an issue. This however will not copy file permission so if that is an issue I recommend using robocopy or xcopy (with the /H /E /C /Y /O) flags.
  • Once the shares are copied over you will need to edit any logon scripts or group polices that set mapped drives
  • Also I recommend either making the shares on the old SBS 2003 server read only or remove them completely. This ensures that no-one is editing data on the wrong server.

General – Migrate Printers & Scanners

  • Any printers shared off the old SBS 2003 server will need to be re-setup on the SBS 2008 server.
  • Please see my other article on deploying printers via a GPO.
  • Check for scanners that may have hard references to the old server name or IP
  • Please Click any of the following link