Microsoft launched new video editing app for Windows Phone

February 15, 2015

Microsoft launched new video-editing app for Windows Phone

New Video Editing app for Windows tablets & Windows Phone launched From Microsoft Company. Video app can download free from Windows Store & Windows Phone Store. This video editing aap works on lumia tablet, surface tablets and lumia smartphones running windows 8.1. Microsoft plans available to all devices running Windows Phone or Windows 8.1.


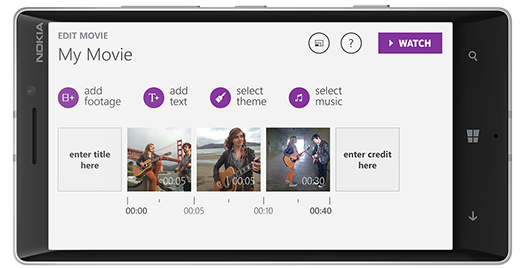
Video Editing app You can Movie Creator lets you combine videos, photos, music, and even cinemagraphs (selectively animated photographs) into movies. edit the length of your footage, move clips to different places on your video timeline, captions, add text cards and various filters. First, Microsoft already has a similar app for Windows Phone called Video Tuner — why release another with similar functionality?

You can also possible to pan, rotate, and zoom, like a selection of branded themes featuring characters from popular DreamWorks animated movies like Madagascar and Kung Fu Panda. It only works on the company’s phones and tablets (Lumias and Surfaces), and we’ve updated the article to reflect this.

You can even pan, zoom, and rotate. Your final result can be anywhere from a few seconds to as long as a few hours. Video editing apps usually require in-app purchases to unlock longer videos, but Movie Creator allows free editing of up to 25 videos, photos or cinemagraphs with no length limitations. Microsoft adopting a totally different strategy which has culminated with the free release of Microsoft Office on mobile devices. Microsoft should build apps for Windows Phone and Windows, not just Lumia and Surface.




Top 13 Windows Key Shortcuts - CrazyTechGuys

August 20, 2014

We are gonna share Top 14 shortcuts utilize the Windows Key  which is located at the lower left hand corner and, the lower right hand corner of your keyboard between the Ctrl and Alt keys. If it is not there, then you do not have a Windows keyboard.
Ctrl  Windows Key Alt

The keyboard image effects that you see above and below are being controlled through an external .css (Cascading Style Sheet) file. These are not actual images, but a carefully thought out list of CSS attributes that gives the appearance of a key on a Windows keyboard.
  1.  Windows Key + E
    Opens a new Explorer Window. Probably one of the hottest Windows keyboard shortcuts. This one gets a lot of hoorahs!
  2.  Windows Key
    Displays the Start Menu.
  3.  Windows Key + D
    Minimizes all windows and shows theDesktop.
  4.  Windows Key + D
    Opens all windows and takes you right back to where you were.
  5.  Windows Key + F
    Displays the Find all files dialog box.
  6.  Windows Key + L
    Lock your Windows XP computer.
  7.  Windows Key + M
    Minimizes all open windows.
  8.  Windows Key + Shift + M
    Restores all previously open windows to how they were before you Minimizedthem.
  9.  Windows Key + R
    Displays the Run command.
  10.  Windows Key + F1
    Displays the Windows Help menu.
  11.  Windows Key + Pause/Break
    Displays the Systems Properties dialog box.
  12.  Windows Key + Tab
    Cycle through the buttons on the Task Bar.
  13.  Windows Key + U
    Displays the Utility Manager with accessibility options; Magnifier, Narrator and On-Screen Keyboard.
  14. Alt + Tab
    Toggle (switch) between open windows.
  15. Ctrl + Prtsc
    to Take a Screen Shot of Present Desktop Screen which includes all Opened windows.
  16. Ctrl + D
    to to Add Bookmart of current Website Link.


Steps to Change Windows XP Logon Screen Background with Yours

July 23, 2014
-->


You can put your favorite image or picture in the background of the logon screen by doing the following methods.

First Save an Image which is created to put Logon Screen background in C:/ location (Example: C:/My_dealdimer.bmp)

How to Get :
  1. Click the Start button and select “Run
  2. In the “open” field, type regedit and click ok
  3. In the registry editor, navigate to HKEY_USERS\.DEFAULT\CONTROL PANEL\DESKTOP and double-click the string “wallpaper
  4. Enter the full path and filename of the .bmp image that you want to use as background (the image must be in .bmp format)
  5. Click “ok” and close the registry editor

Note: Should Restart the computer for changes.

If you want to see the background set in tiled effect with the bitmap then


Follow the below steps :

  • Click the Start button and select “Run
  • In the “open” field, type regedit and click ok
  • change the string HKEY_USERS\.DEFAULT\CONTROL PANEL\DESKTOP\TILEWALLPAPER to “1″ instead of “0
  • Click “ok” and close the registry editor


-->


Gmail via Outlook for Windows and Mac - Step to Step Configuration

November 20, 2013
Google Mail (GMAIL) via Outlook for Windows and Mac - Step to Step Configuration
Here is another tip for Gmail Users, Now you can configure Gmail in your MS office Outlook with more handy, Our Step by Step Guide will differently help even Beginners/Dummies much easier,

Promotion for India: Check out Online Shopping Deals, Coupon & Lowest Price Products from Our Price Comparison Web Site - http://www.dealdimer.com


  To configure Outlook for Windows so it can retrieve Google Mail: 
  1. In Outlook, choose the File tab.
  2. In the File window, click the Add Account button.
  3. In the Add Account window, choose the option "Manually configure server settings or additional server types." Click the Next button.
  4. Choose the Internet E-mail option. Click Next.
  5. On the Internet E-mail settings windows, enter the following information:
    • Name: Enter your first and last name.
    • E-mail Address: uniqname@umich.edu
    • Account Type: IMAP
    • Incoming mail server: imap.gmail.com
    • Outgoing mail server: smtp.gmail.com 
    • User Name: uniqname@umich.edu
    • Password: use your Kerberos password unless you have changed your Google password manually
  6. Click More settings.
  7. On the Advanced tab, in the  Incoming server (IMAP) section, choose SSL from the drop-down list. The port number will change to 993. 
  8. In the Outgoing server (SMTP) section, choose TLS from the drop-down list. Change the port number to 587.
  9. Select the Outgoing Server tab.
  10.  Select the box My outgoing SMTP server (SMTP) requires authentication. Leave the Use same settings as my incoming mail server option selected. 
  11. Click OK.
  12. Click Next. Outlook will send a test message to verify your account settings. 
  13. Click Close.
  14. Click Finish.
Outlook will begin downloading mail information. If you have a large mailbox, this could take a few minutes.


   To configure Outlook 2011 for Macintosh so it can retrieve Google Mail:  
  1. In Outlook, choose the Tools menu at the top of the screen (NOT the Tools ribbon in the Outlook window).
  2. From the Tools menu, choose Accounts.
  3. In the lower left corner of the Accounts dialog box, choose the Add menu (it looks like a plus sign [+]), and then choose E-mail.
  4. Enter your Kerberos email and password (unless you have changed your Google password manually), and choose Add Account.
  5. The dialog box will expand. Enter the following information:
    • User Name: Enter your Kerberos email.
    • Type: IMAP
    • Incoming mail server: imap.gmail.com 
    • Incoming mail server: "Use SSL to connect (recommended)"--click checkbox. The port number will change to 993. 
    • Outgoing mail server: smtp.gmail.com 
    • Outgoing mail server: "Override default port"--click checkbox. Go back one field and change the port number to 587.
    • Outgoing mail server: "Use SSL to connect (recommended)"--click checkbox
  6. Click Add Account.
  7. Click More Options (in the "Outgoing server:" section). A dialog box will open.
  8. From the Authentication combo box, choose Use Incoming Server Info.
  9. Click OK.
  10. Close the Accounts dialog box.
Outlook will begin downloading mail information. If you have a large mailbox, this could take a few minutes.


Download YouTube video in Chrome without software

November 15, 2013
Download YouTube video in Chrome without software
In Online you can get many of Software's or Tools to Downlaod YouTube Videos, But beware from Malware & Spyware which are also Pre Installed from your Downloaded softwares.

Here we are helping you to Download the same YouTube Videos to download with out using any software.

Tips Provided Buy :  Dealdimer.com

Follow the following steps :-
1) Go to Savefrom.net
2) Now find out the link Savefrom.net helper
3) Now click on Add to Chrome button
4) You will get a file called helper_last.crx, now bring it to the Desktop
5) Now go to Chrome =>  Tool  =>   Extensions
6) Drag and drop the file helper_last.crx, to the Extensions page and press the pop up Add button.

Thats all, Now you can Downlaod Youtube videos from this new Crome extension.


Windows7 Help: Create shutdown and logoff shortcut

November 15, 2013
Dealdimer Team :  http://www.dealdimer.com 

From this Post You are going to Learn how to create Shutdown and Log off  Shortcuts on Desktop. It is very useful, you don't need to go start wizard to shutdown or logoff your computer, by following this tutorial you can do this task by one click.

Follow the following steps carefully

To create Shutdown shortcut

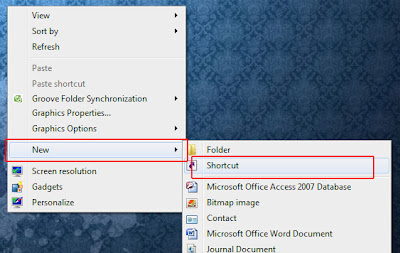
1. Right click on Desktop and go to New and then Shortcut


2. After that type Shutdown -s -t 00 in the Type the location of the item field as shown bellow then click on Next
3. Write the shortcut name as Shutdown in Type a name for this shortcut field,after that you will get a file like the following one on your Desktop


4. Now we have to change the icon.To change the icon follow the following steps.


  • Right Click on the shortcut you have just created and then go to Properties and then Change icon
  • After that a window will appear click OK,you will get a icon list like this


  • Choose the usual Shutdown icon,and click OK and then click Apply and OK respectively

To create a Log off Shortcut

Follow all above Steps to Create Log off Shortcut, But
in 2 Step Use Command as  : Shutdown -L instead of Shutdown -s -t 00


Blogger Help: Decrease the space between sidebar and post body

November 15, 2013
Blogger Help:  Decrease the space between sidebar and post body
Google Blogger has beautiful inbuilt blog templates that gives a nice look to our blogs,

we can use them without making any significant changes, but sometimes we are interested to customize the template in our own way

If you your blog have space between post body and sidebar or may be the spacing between header and post body,
So basically at last we need some partial changes to the templates to make a self satisfactory blog, in this context we need to learn some primary coding languages.

Follow the following steps Provided by Dealdimer.com :-

1) Go to Template-----Edit HTML

2) Search for the code ]]></b:skin>
3) Place the following piece of codes just before step 3 code

 #sidebar-right-1{
position: relative;
left: -12px !important;
}

Now You can adjust the value -12px according to your spacing.